Monday, February 25, 2013
Text Messages
I'm working on a submittal for a SAQA call to artists, with the theme, "Text Messages." It must be finished and photographed and uploaded by Thursday. Yet I'm here killing time on the computer. I don't understand me sometimes!
Wednesday, February 20, 2013
Yet More Dyeing
Since the previous post, I've had two more dye sessions. I still have not fully used up the dye concentrates I mixed over four weeks ago, now. The first session was aimed at making grays. I made four yards, I think, in four separate bins. They were created using (1) plain jet black (2 yards), (2) Jet black plus Fuschia, (3) Jet Black plus medium blue. They came out more mottled than I was hoping. I decided that I was just not getting the soda ash worked through the fabric adequately in the small boxes.
So yesterday's batch was done in the bigger Sterlite boxes. I had to scavenge some from fabric storage, but they can go back when I'm done. I decided to again use the layered low immersion system. I like getting three gradations of the same color. It's fairly easy. I didn't have colors in mind right off, so I looked at the stash, and said, what do I most need. My notes on a scrap of paper said,
"Light Orange, Yellow/brown, and Reddish Gray." Here's a little overview of the process.

Here's the "dye studio" AKA play-doh Table AKA pingpong table. I just lay out an old shower curtain on the floor, pull out as many bins as I need, and have at it. The sink is about 20 feet away, so I bring over bins of rinse water for my gloves and tools, clean water to mix dye concentrates from, and one of soda ash solution.
I forgot to take pictures of the bins with the third layers in them, but they didn't look too much different than the second layer. Here are the resulting fabrics all washed and ironed.

As I've read in Lisa's descriptions, "red goes first." She talks about how the upper layer of something that started out red can end up green... I didn't have anything that dramatic, but you can see how that very very dark purple mash ended up being magenta-ish on the first piece, purple-ish on the second and blue-gray for the last two. At least I got something gray.
It was interesting how the orange and pea-soup-baby-poop colors were so different on the first pieces, but they went back toward pure yellow to the point where I honestly don't know which of the two light yellow pieces came out of which batch.
So yesterday's batch was done in the bigger Sterlite boxes. I had to scavenge some from fabric storage, but they can go back when I'm done. I decided to again use the layered low immersion system. I like getting three gradations of the same color. It's fairly easy. I didn't have colors in mind right off, so I looked at the stash, and said, what do I most need. My notes on a scrap of paper said,
"Light Orange, Yellow/brown, and Reddish Gray." Here's a little overview of the process.

 |
| Here's "light orange." Hmm. Dye definitely didn't lose any strength since I mixed it on Jan. 28th. This was pure golden yellow with a quarter teaspoon of fuschia. |
 |
| The next attempt was for yellow/brown. Not too far off from my aim. This was pure golden yellow with about a quarter teaspoon of blue. |
 |
| With all the yellow dye solution used up in the first two bins, I had red and blue and a desire for gray. I thought that if I used enough of the red and blue it would make something almost gray/black. But it seemed instead to make a really dark purple, so I decided I needed black, and mixed up a pure mash of one teaspoon with a small amount of water, and added it in there..... No, I really DON'T like planning and predicting. I really like winging it. It looked dark enough when it was wet... but I have learned not to count on anything until it's washed and dried. I love the suspense! |
 |
| Using the Ann Johnson via Lisa Call multi-layer method, I smoosh the first batch, hit it with soda ash, then add the next layer. In this batch I only had six yards left so the first run of each bin was a yard, the remaining two were 1/2 yards. Should have gone the other way, as this was closer to the color I wanted. |
 |
| The second layer here was also much lighter. |
 |
| There was SO MUCH dye in this bin, the last two layers didn't get close to soaking it up, so I threw in a random fat quarter of beige fabric to see what difference using non-PFD fabric would make. |

It was interesting how the orange and pea-soup-baby-poop colors were so different on the first pieces, but they went back toward pure yellow to the point where I honestly don't know which of the two light yellow pieces came out of which batch.
Monday, February 18, 2013
Time.... always my issue
Having a holiday on Monday that was not really a holiday was heavenly! So nice to have a whole day without chores or errands.
Wednesday, February 6, 2013
More dyeing
Last night I very thoroughly enjoyed ironing the six yards of fabric that I dyed on Sunday and washed out on Monday. This process is VERY addicting. It's so much fun to mix up colors and see what you end up with. As I've mentioned, I'm not following any one method or book, just reading about techniques, then winging it. I can understand that most people might want a little more controlled process, but I learn so much better by trying something than I do by reading about it.
Everyone insists that you should write down your process and list what recipes you used, so you can duplicate your results, but I'm not really ready for that, I will start doing it when I really think I want to duplicate something. However, I do want to at least remember generally what I did, and the blog is the easiest place to write it and not lose it!
Everyone insists that you should write down your process and list what recipes you used, so you can duplicate your results, but I'm not really ready for that, I will start doing it when I really think I want to duplicate something. However, I do want to at least remember generally what I did, and the blog is the easiest place to write it and not lose it!

- 3 YDS. The first batch was magenta - very solid with little mottling - I used 1 cup of water to wet then added 1 cup of soda ash after 15 mins. They cooked overnight (I think) .
- 6 YDS. The second batch had a lot of mottling - they were soaked in soda ash solution first, dye solutions were also mixed in the box, just sloshed around, so they probably contributed to the multi-tone look.
- 3 YDS. The third batch I went back to plain water first, soda second. The yellow was solid Golden Yellow concentrate. Still very slightly mottled. The bright oranges were well-mixed yellow + fuscia. As I was warned, it takes VERY LITTLE red (fuscia) to overcome yellow. The first try was two tablespoons, it went very orange. The second try was a teaspoon, still very orange.
- 3 YDS. The next three colors were experiments in using up the dye remaining in the box. Reusing the yellow solution gave a pale yellow (okay that makes sense) but I wanted to make it more subtle so I added a teeny tiny bit of black (teaspoon maybe?). It is my least favorite, because it just looks dirty. The other two were attempts at gray. I used test strips of fabric to see what I was mixing -it's almost impossible to tell just looking at the liquid. The second one started to go to brown and I didn't like it, so I added more blue, which resulted in a gray-green which came out a nice sage-y color when done. I like it ! The third was a lot of just throwing drips of dye into the box until it looked interesting - it came out a very nice gray-mauve. I LOVE DOING THIS.
One lesson learned - I read that concentrates don't keep long, and can go bad in a week, so I expected weak colors. Not so.They were VERY bright after 8 days. I thought I mixed a small amount for only a few yards, but I've done 12 and there's still enough for 12 more, I'd guess, if I made lighter colors. We will see if it lasts two weeks. It's cool in the basement, but I have not refrigerated them.
Monday, February 4, 2013
If This is Slacking Off...
I'd started to title the post "Slacking Off," because I felt crummy yesterday, fighting a cold, and felt like I wasn't really getting things done, and because I didn't sandwich and baste the big quilts, which was one of my weekend goals. Probably because I don't really want to. I'm insecure about how to quilt them, and concerned about making a mess. So I procrastinate.
But when I went downstairs to take pictures of my latest dyeing adventure, I found I have been doing quite a bit of "stuff." Here's a selection. I'll write a separate post about the dying process next.
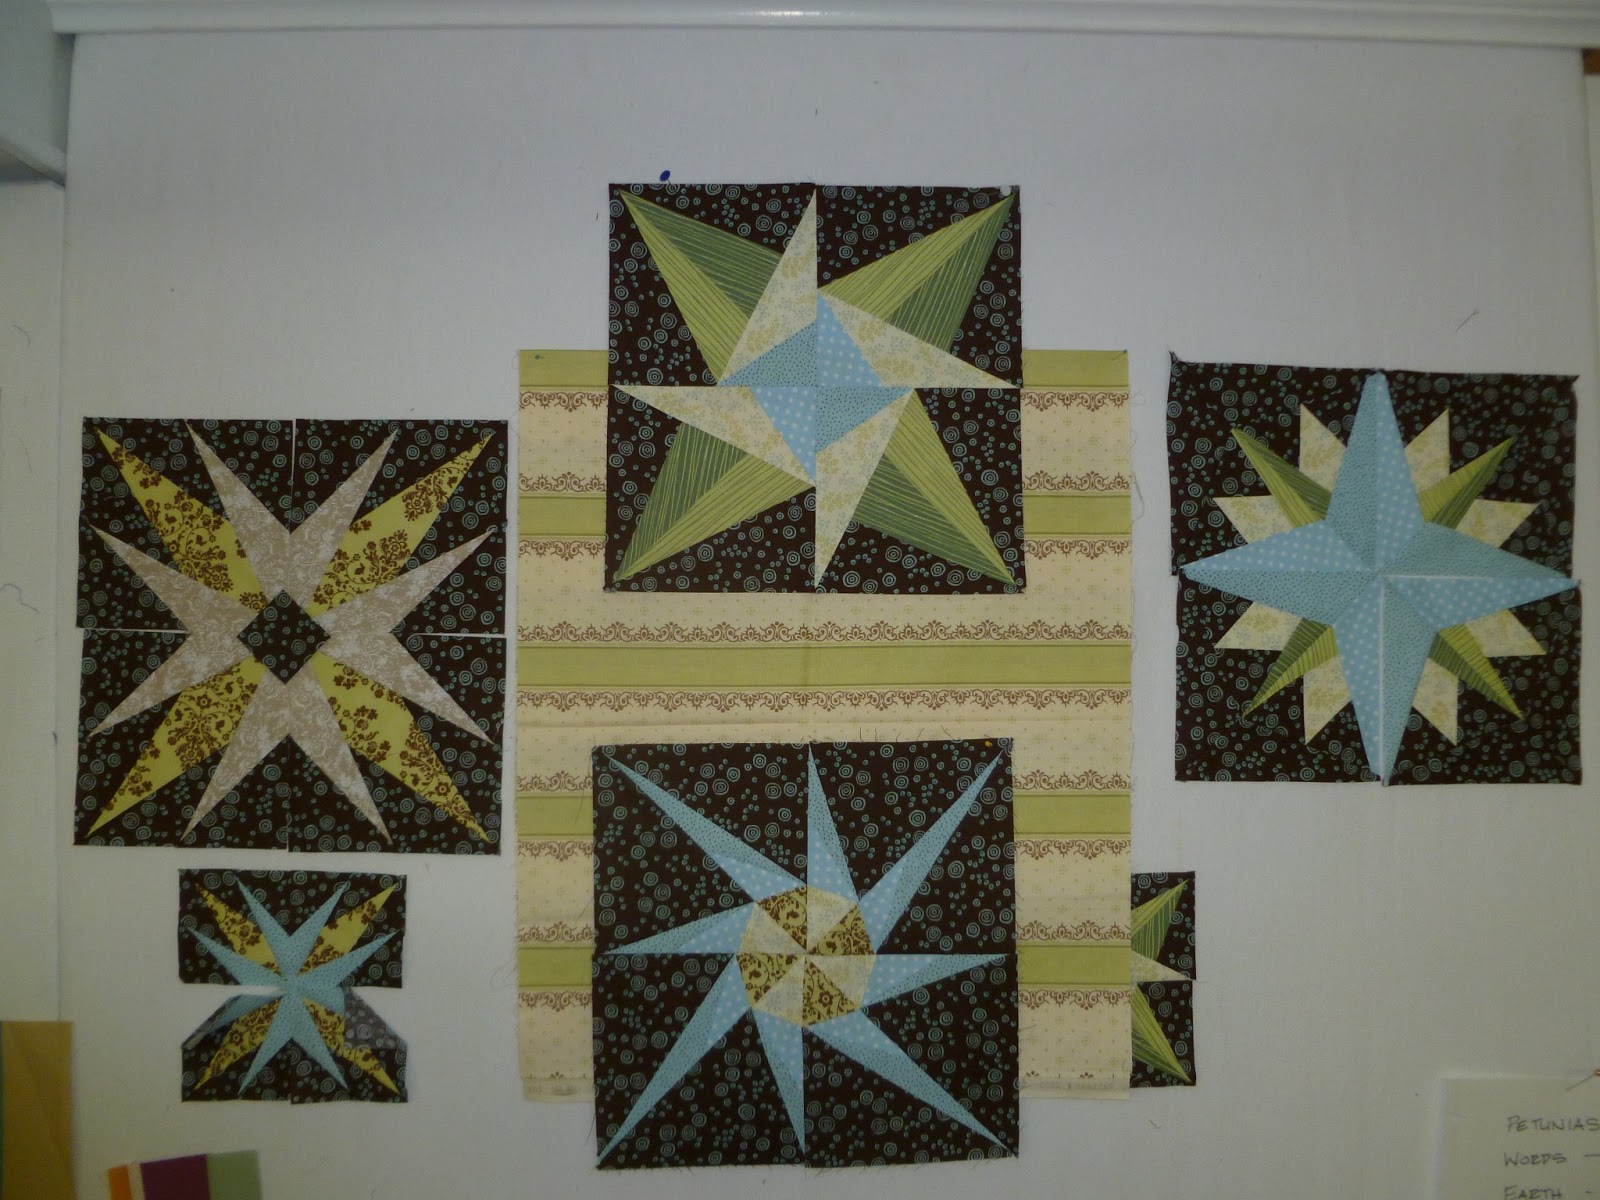 |
| The Star Obsession continues. The February block was released on 2/1/13 by Don't Call Me Betsy, and I had to start it first thing. It is the one on the left. I didn't like the way my beige and green points sort of muddled together in the center, so I added a diamond. I haven't decided if I'll just applique it on, or piece it in on each of the four points. It seems like this stripped fabric would make really cool sashing, if I have enough or can get more. It's from a line called Lily & Will which coordinates with some of the other prints. I think when I get nine of these guys done, I'll make them into a wall hanging. In addition to the QAL by DCMB I'm making some others that I found free. The first one was on Craftsy, but the rest are available via Quilting on the Square. They are called "Which Way North?" The one on the right is from that group. |
 |
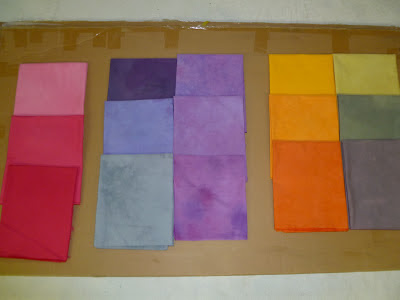
| These are the pieces of fabric I painted with my new art group last weekend. They look more interesting on the wall than they do in real life. I'm not sure what to do next, so I just stuck them on the spare design wall. Otherwise they'll fall into that UFO black hole. |
 |
| I also made a minor revision to this piece last night. This is the revised. Can you tell what changed? Sometimes it's hard to remember what you were thinking three months ago. |
 |
| ...but I'm really not sure why there was a pale pink line in the upper part of the right side. I like the new one much better. And that green strip was just sitting on the table waiting for me to use it. |
 |
| The parts and pieces that were at one time slated to become part of WIS #5 are back on the board, which lead me to trying this arrangement. My goal now is to make three smaller pieces, and not put them together into the "standard" size and shape. |
So I guess that I will let myself off the hook for being a slacker.
Subscribe to:
Posts (Atom)