Wednesday, December 28, 2011

2011 Retrospective

I guess it's about that time again, to look back at what this year held.   It's been a busy year, and I didn't do as much quilting as I'd hoped, but having a wedding thrown into the middle of the year is a pretty good excuse, I think.  I took a lot of classes.  I think classes are important  for me to learn anything and everything I can - every different style, approach, method.  Attending QSDS was a huge step for me and gave me a great opportunity to meet a wide range of art quilters.

Classes I took:

May 8-9, 2011  - Janet Fogg Workshop "Unexpected Combinations."  I'm still excited about the project I started in this class although it  has never gotten past the full scale cardboard pattern and selection of fabric.  I hope I can still remember all her techniques when I finally get back to it.  That would be a good "real" art quilt to tackle this year. 

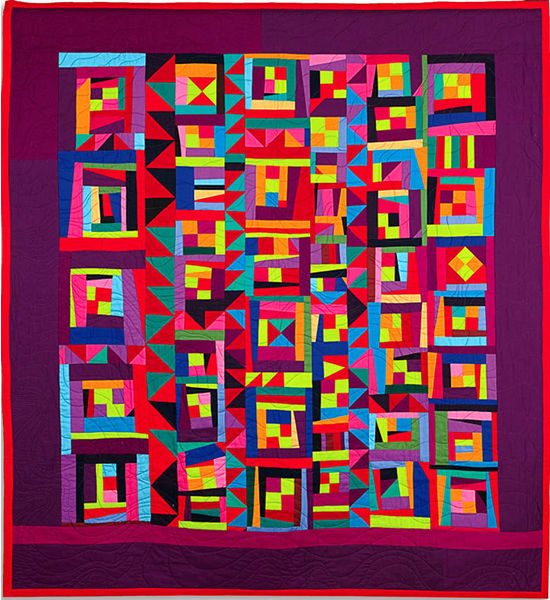
May 13, 2011 -  "Liberated Log Cabin" with Gwen Marston - I am just this week finishing the quilt made from the pieces I created in her class.  I'm doing a more dense all-over pattern that is getting me away from my tendency to stitch in the ditch.

Janet Fogg

Gwen Marston


June 11 - 15, 2011
 - "Favorite Places," with Valerie Goodwin at QSDS Symposium
October 10, 2011 - Karla Alexander, "Stack the Deck" quilts via Moonlight Quilters.
December 10, 2011 - Jan Hudson, "Needle-turn Applique."


Goodwin
Looking only at things that are totally completed, i.e. hanging on the wall, ready to be hung, sold, gifted or used, here are my accomplishments:

Functional Stuff - Quilts
1.  "Stolen Moments" was my biggest project, first full-size bed quilt, and winner of a nice blog prize. It took most of my time during the first three months of 2011.


2.  "Organic Waves" is the couch-throw size quilt that came out of Karla Alexander's class.  Fabric selections, cutting, class, and finishing occupied October and half of November. I wish I had not used cheapo poly batting.


Functional Stuff - Other Stuff
3.  Katie's placements.  This was fun. I enjoyed the intuitive piecing process and learned about color, value, and how to or how not to mix prints.

4.  Cora's apron - was pretty quick and easy.  I was glad to be able to do something for Elisabeth as she's always ready and willing to help me out.
While I did learn something from these functional pieces, a goal for next year is to resist the temptation to make modern quilts, home decor or other accessories and to focus on art quilts.


Art - FFFC Pieces
5, 6.  Sadly, I only fully completed one piece, #56 and that was the Goldsworthy ephemeral piece, the nature of which was to self-destruct. I hereby resolve to finish at least 6 next year! I thought about them all anyway.  Sigh. The only other one I even started, was #52,  Marriage.  (Color Field Theory) I loved the idea, hated the result.  I'm thinking some paint or other surface texture might help it.  Note:  Forgot that I also completed the Celtic Knot piece...   The Art Deco and Notan pieces are more done than not, and could get finished fairly easily, now.  So that's really five that were completed at least to a postable stage.  Next year I'll finish those as well as the challenges.


Art - Other Stuff
7.  The Bird Brain shop hop block.  Fun.  Pulled me into doing more embellishment, something I keep saying I want to do, but don't end up doing.
8.  The Acropolis, from Valerie's class.  Greatly expanded my comfort level and familiarity with more surface design techniques.  I hope that next year I will focus on the map quilt idea and try to develop a "body of work" or at least explore a concept in more depth.

I've spent a fair amount of time in the first three or four rounds of the Moonlight Round Robin too, and will end up with some sort of finished piece at the end of that. My contributions so far include hand stitch, beading, words, and felt+button flowers. My favorite was the experimenting with "Words." This is a theme I'd like to pursue more next year.


The other goal will be to either finish the UFO's or accept them as practice and decide not to spend any more time on them.

Maybe I can finish one more piece before the stroke of midnight on 12/31/11?  The log cabin piece is basted and ready to quilt.  Edit: quilted about 1/3 of it last night.  It's slow going with the walking foot, but I'm not yet fluent in free-motion.  Another goal for 2012!

Tuesday, December 27, 2011

Christmas Ornaments Completed

It was a very busy holiday season.  I didn't have time to make cards this year - I didn't even end up sending commercial cards, just e-cards.  After signing up to decorate a table at the guild Christmas pot luck, there were no tables left when we got there, so we had to sort of squeeze into someone else's.  Oh well, live and learn. I spent way more time on the ornaments than they were worth.  But it was fun.  Here are some shots of some of the finished ones.  There were four trees, but two were given away.  Same with the snowmen.

Made about six of these from "cheater" fabrics.  They were sort of cute but oversized for my little tree.
Hard to see but there are some sequins sewn on. 

Trees - front, I liked these- fun to make!

Trees - back.  Nice that they look good from either side.


Really liked this too - the bow's a little oversized, but better than the dinky ones I tried first.

In other news there was a potluck Christmas party for Grateful Threads, too. We divvied up the Petunia sections, randomly drawing numbers.  I ended up with section 2 - the top, center.  The first place your eye will go.  Uh Oh. Overall the photo is about 34 x 45... just under 3x4 feet.

We're not rushing into anything, which is just fine with me.  My first contribution was to import Jo's photo into  Autocad and print multiple sheets so each person could have their own puzzle piece, plus a bit of the adjacent ones.  There is a scheme for quilting as we go, I think, rather than piecing then quilting.  I'm not sure I understand it, but all we need for the January meeting is our fabrics selected.  I've been working in Photoshop to try to identify a gradient from light to dark in the green and pink families.

In still OTHER news, I've purchased a class called Stupendous Stitching from a website called Craftsy.  It was on sale for $19.99, which sucked me in!  You can work at your own pace, and ask questions, post photos etc.  So far I've been watching on my new iPad, but it doesn't support the forums.  


I think it will be fun, and like the idea of learning to make more creative use of all those machine stitches.

Sunday, December 18, 2011

Monday, November 28, 2011

Wonky Cabins

Over the long weekend I was able to finish the quilt top for a piece I am calling "Wonky Cabins."  It is a nine-patch (obviously) made up of the bits and pieces I created in the Gwen Marston class in May.   I consider it a practice piece.  I'm not unhappy with it, and in fact hope to have it sandwiched, quilted and on the wall for our office party on December 16.   But rather than a work of art, I consider it a learning experience.  I definitely prefer working intuitively to following a set pattern or system, even if the design is of my own devising, I get bored executing it multiple times.  But it's hard sometimes to see where you're going when you start without and end in mind.  I wasn't sure that the black blocks with the "bits" really even wanted to be in the same composition with the wonky log cabins, but to be honest, I just wanted them all "used up," because I was ready to move on.  I'm also ready to be done with prints.  Too bad I have a huge stash of them!   

I am not sure yet if I will put a border of some sort on it or not.  Looking at Gwen's samples She uses a wide border frequently to sort of corral things. 
Wonky Cabins
So my own critique: 
Pros:  
1) The color palette is varied enough to provide interest, but limited enough that it doesn't seem totally random. 
2) I like the wonky then squared feeling of chaos within organized framework.
3) I like the way the orange stripes give it a "base." (Only turned it sideways after completing and decided I liked it that way),   
4)  I think the repeated fabrics, especially the aquas and oranges, pop out and create enough contrast in the blocks to keep the eye moving and interested. 
5) Ditto for the floating blocks in the center of the black squares.
6) Even though the blocks were randomly pieced and not measured at all, I liked being able to inprovise enough to make them line up in rows.  

Cons:  
1) The intended light/dark log cabin blocks don't have enough contrast (or I wasn't consistent enough) to make the pattern recognizable. 
2) The Xs in the black squares stand out too much, I wanted the Ls to be floating in a sea of black.
2) Some of the dark colors are too muddy next to each other. 
3) I'm not sure if it's wonky enough or just looks like I'm really sloppy or lazy.
4) There's no focal point or hierarchy so my eye just wanders in circles.

Bits before being assembled
Anyway,  I read a really good comment recently and swore I'd remember where it was this time so I could link and credit, but of course I don't.  The gist of it was that it's not bad to be dissatisfied with your work, because if you are passionate about your art, then you will always be striving to be better with each completed piece...    


Monday, November 21, 2011

Design Wall Monday

Now that the big quilt is done  and off the wall, I decided to pull out a bunch of UFO's to get my mind back into design mode.  This is not ALL the UFO's but it is a good representation.  There are also a couple "finished" pieces, that currently have no homes.  

This noon I went through the start up process to start selling on Etsy.  My intent is to put up some of these pieces at reasonable prices and see what happens.  I have no desire to keep them all here.  I consider them learning experiences rather than finished art work.   I will be clear with my descriptions that they are "student" work, and priced accordingly.  I hope that by the end of the year I can have a good selection of items to make it feel like a real "Shop."  There is also the process of customizing the shop to make it appealing.   It's too late in the year to go after Christmas markets, but I might work on some Valentine's Day items. 

I really have to learn how to photograph my work better.  Without flash, the light seems too yellowish.  With flash it's sort of dark and blueish.  
The whole design wall


Large blocks from Gwen Maston Class


Small blocks from Gwen Marston Class


Blocks done when I was participating in the Bumblebeans 15 Minutes Play site.


An almost-finished piece featuring bead embellishment.


FFFC Challenge on Art Deco


The piece from QSDS featuring the "Gram's House" plan

The Visual and Verbal Together

I spend a LOT of time - okay, WAY too much time - clicking around Pinterest. It's impossible to go there without clicking one or two little pins.  Even to retrieve the URL just now.   It's just so addicting to have this constant feed of visual stimulation.  And it hooks itself in to my horder instincts.  Instead of piles of design magazines that I "might need for reference one day," or file drawers of clipped articles for the same purpose, I can now stick every image that intrigues me on a virtual pin board.  What could be better?!?
(Road to Town, woodcut by Gustave Baumann, 1881-1971, 
German-born American artist and puppeteer)
Well, here's something better that I found while browsing Pinterest last night - an Art/Poetry blog.  I just LOVE the way she illustrates her daily poetry selections.  Hope you'll enjoy it as well:  A Poem A Day From the George Hail Library, Selected by Maria Horvath.  Enjoy!


Wednesday, November 16, 2011

Organic Waves Finished

Here is the finished quilt from Karla Alexander's class.  Sorry for the terrible photo.  I stuck it up on the wall in a hurry before I took it to show and tell at the guild meeting Monday, and this is the first chance I've had to post it.    


Overall I'm happy with how it turned out.  I'm not thrilled about using the cheapo fluffy batting, but when I realized I didn't have anything else big enough in the house I went ahead with it.  It's not something I'm going to love forever, and at least the poly stuff is warm. It looks nice on the couch.   I learned a lot from this quilt about color and value.  That even when you combine twenty greens, they don't all play nicely together.  I thought from the start that the light yellowy one with the olive leaves on it stood out too much, but I did it anyway.  Mistake. And the mossy green in the dark group is too light and stands out too much.  But still - overall - it's fine.  


I quilted in the ditch on the squares and on the wavy lines.  If I'd had thinner batting I would have done more dense quilting, but I had enough issues with the backing getting folded and puckered.   I was able to get almost all the quilting done on Saturday and finish the binding by Sunday night.  I did both sides of the binding by machine.  I really don't mind the look of this for regular, functional quilts.  I used all dark fabric to bind, to sort of provide an edge or frame, then used dark thread on the top side, and light on the bobbin.  


I think I'll go curl up on the couch with it right now!

Sunday, November 13, 2011

Somersault - or Organic?- finished tonight.  Maybe I'll post pics tomorrow.  Too tired tonight.

Monday, October 31, 2011

FFFC #62 Progress Continues

I really had a lot of fun working on this piece all day yesterday.  Spent way more time than I expected, and made a few costly (time-wise) mistakes, like accidentally adhering the two halves of my triangles to each other when ironing on the freezer paper... but I think it's been worth it.  With a little luck, I will have time tonight to finish the fusing.  Here's a photo-journal of the day:

I used AutoCAD to enlarge one of the squares from my last post to a six-inch size, printed it onto freezer paper, and then adhered it to triangles of black fabric that had been backed with fusible webbing.

Here's a look at the first cut-out pieces, making sure I know where they all came from!

Starting to see the pattern emerge....

OMG, what have I done?
After all that cutting, I laid out a piece of white fabric and used a heat-erase marker to rule out 6" x 6" squares.  Turned out my pieces were not precisely 6" (moi, imprecise? ) but the design allowed for some fudge factor, thankfully. The printout of the full design was needed to make sure I was putting things in the right places.
Starting to take shape...

Trying to separate pieces that had been accidentally fused resulted in a severe case of the fuzzies.  Hope I can trim/brush them out when I'm done.  I gave up at about 10 pm last night.
Here's how it looked at bedtime.  I had put up all the cut pieces that were not fused wrong, so tonight I have to re-cut more fused pieces... but it will be worth it, I really love this design.

I will probably post it to the FFFC site after completing the fusing. It was suggested that we could just do paper or cut-outs photographed, but I love this one so much I want it to be a finished piece.  I am hoping I can get some good feedback on how to bind and quilt it.  I'm not sure if it wants a black border or not.  Can't wait to see what the other FFFC members have done, but don't want to look too soon, it's more fun to see a big "reveal" at the end.


Organic Quilt progress

So I got as far as putting together ten rows of blocks, and then sewing together four of the ten into a pieced top.  Only five more seams to get it completed, but I am sidetracked on FFFC for the next day or so....


Sunday, October 30, 2011

FFFC #62 in progress

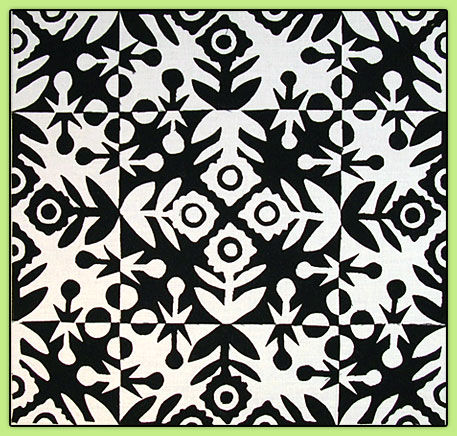
I've been having fun making repetitive patterns with the Notan process.  I'm not sure if this was exactly the intent of the challenge, but once I saw Ticotsky's piece, I had to try it for myself.  Using AutoCAD software made it easy to try several variations.  Here are three that I tried out:


And here is the one I decided to make up - 
(with some simplifications when I started trying to cut it out!)


Friday, October 28, 2011

FFFC #62

It's Fast Fabric Friday Challenge time again.  I have been a terrible slacker about doing these.  Once I let an excuse get in my way, it was easier and easier to let another one sneak in.  But this month's challenge looks like a LOT of fun...   It is to use the Japanese technique of Notan.  I had never heard of this, but I love it already!  


Here is a beautiful example by Lynn Ticotsky

This example popped up quickly, and I've discovered another interesting Art Quilter in the process.  It will take some work before I figure out how to create such a fantastic image - but I'm ready to start now!  Darn job, anyway.  


Tuesday, October 25, 2011

Somersault Quilt

Here are a few pictures of the progress on the Karla Alexander class quilt.  It is So interesting to step back and see it on the wall.  I am able to get about 13 feet away, which meets Karla's "ten foot rule."  But I discovered taking a photo and looking at the photo is an even better way to get a fresh look at the overall composition.  

It was so exciting to be able to put the squares up on the design wall!

Not sure if you can tell with this photo, but there's a small glitch in the upper right corner.
Last night I just put the pieces up following the book design, not worrying about which particular fabric went where.  (I looked at a couple other possible patterns that could be made, but decided I like this one best.  Especially since I'd already put on all the little squares.)   Tonight I have a shopping outing planned, but tomorrow I will start moving them around so that the different fabrics are more randomly distributed.  And figure out what to do with the glitch.  It's only a minor glitch.  I sewed a few too many little squares on, and don't have enough plain ones.  So I can rip them off or maybe use a couple slightly off-size blocks that I've set aside.  Or make a new block.  There was plenty of fabric left over, but somehow the idea of stepping back to make another block instead of moving forward is sort of unappetizing.

I'm really pleased with the visual quality and excited to see this thing put together an draped over the back of my couch.  While trying to get motivated to wake up this morning I was contemplating quilting designs.  I am still a "stitch in the ditcher" when it comes to skills, but I really admire the look of the more densely quilted "New Modern" quilts I see on line.  So maybe I'll add some diagonal lines?  Maybe in the opposite direction from the pattern...?


Friday, October 21, 2011

Workshop Planning and Organic Quilt

I haven't been blogging much. I've been completely absorbed in and obsessed by Pinterest.  It's a familiar pattern.  I find something new and different, and can't tear myself away.  Then I get bored.  I'm now bored with Facebook, thank god!.  Pinterest is different, I can browse images, mostly of art quilts, for days.

I'm starting to get serious about getting ready for the Nancy Crow workshop in February.  This involves buying lots and lots of fabric.  My estimate is I'll need to take at least 80 yards of solids.  I've never bought many solids, so there's lots of shopping to do.  I don't want to be limited  by my fabric choices, but at $7-8 a yard... well you do the math.  This week I ordered, and received (IN TWO DAYS!) a 16-yard Kona Cotton sampler package from Pink Chalk Fabrics.  It's beautiful!  I love to look at it.  Of course there's also the tuition, meals, and housing.  But I'm totally psyched, thrilled, and a bit scared.  I hope I have some decent work to take with me.

That leads me to wonder why I'm spending time on the Karla Alexander quilt project and not the art quilts I always think about but too rarely work on.  But it's good sewing practice, and I need that! I'm calling it "The Organic Quilt" because that's the term she used.  I didn't really get it because we are all cutting the same curvy blocks.  But everyone else did blue or purple like the example.  I did green.  And mostly earthy greens.  To match the NEW COUCH!.  Anyway, I enjoyed the class.  It was low stress and enjoyable, and the quilt's coming along well - since we cut blocks prior to class we could actually achieve something in the 6-7 hrs. we were there.  It sure goes fast!  I have all 70+ blocks cut out, sliced, shuffled and reassembled.  Now I need to trim to size, add the accents, and figure out the layout.  Karla says to do the layout before adding the accents, but my NEW DESIGN WALL isn't quite big enough for that.  I guess I'll do what I can.

I should have posted about the design wall last week.  Having a DH at home between jobs sure is a blessing! He built a removable styrofoam wall that is about 7 feet wide, and 4 feet tall.  7' because that's the space we have between light switches.  And 4' because that's a standard sheet of insulation.  I LOVE it!

Here's the finished version, with the fabric somewhat  permanently attached.
Yes, that's just blue painters tape.  But I will probably change this white flannel to a piece of batting at some point.

Saturday, October 8, 2011

The Slow March...

The slogging through the UFO list continues.  Tonight I finished up the Acropolis piece that was started at QSDS.  I also did a really ugly friendship block that I don't think I'll even bother photographing.  The person wanted scrappy, fall, earth tone prints.  and the block was this strange set of 2" x 3 1/2" bars... maybe I will photograph it tomorrow... I really didn't get it, but it involved sewing 18 small pieces together, and when I had completed my first try, it was a full half-inch shorter than it was supposed to be.  So I forced myself to check my 1/4" seams, and my cutting, and go through the WHOLE THING all over again.  I guess I cut too small typically because on this second try I left what I thought was "extra" but it came out just right.  I guess that was a good, but painful and tedious learning experience.


For the Acropolis, I thought it was "basically done." But it still needed batting and backing (a lot of stitching was done on just the front and the stabilizer).  So that needed a bit of quilting to hold it together.  And attempting to cheat and not baste properly resulted in a big bulge and a lot of stitch-ripping.  After that, I decided to try a mitered binding, based on a tutorial by Susan Brubaker Knapp.  Suffice it to say that it's harder than it looks.  Again there was much ripping.  
And when I was finally all done, and stood back to admire it, I realized the original intent was to cut about another inch off the right side.  Which I could still do.  Better to cut too little than too much.  But I doubt I'll ever rip that hard-earned binding off to do it.  So - it's officially "finished." and off the UFO list!

Monday, October 3, 2011

Fabrics bought and cut...


This is what I've come up with so far.  I need 9 darks and 9 lights.  There are 7 good light fabrics, and two questionable ones.  I might keep searching for those.  I can always find some other home for the rejects.  In the dark group I've cut up 10 options. I'll probably eliminate the blueish black one on the right side.  It looked more green IRL.  The photo below is after desaturating it - taking the color out to see pure values.  Interesting, I think.  The two questionable "light" ones are even more questionable.  I think if I pair with something even darker they might be okay, but not sure if I want two "bad" ones.  Need to find at least one more light piece.  


Sunday, October 2, 2011

Starting Another Project

What am I thinking?  I tried so hard to resist signing up for another class.  But when I heard at the guild meeting that there were still spots left in Karla Alexander's Class scheduled for October 10 I weakened and put my money down.  We had the opportunity to choose between several projects, and although I liked another one better, I decided to stick with this - as it is less complicated, and thus easier to actually complete - I hope!  


I first tried to select fabrics in a terra cotta tone that would go in the new living room, and contrast with the color of the couch.  But there just was not enough available within the range I wanted to make the design work.  So I shifted my emphasis to green.  The green throw on the green couch with the green wall behind it could be a bit much.  Oh well.  I thought of trying two colors - dark browns and light greens but I think it would loose it's charm that way.  What I like most is that there are some fabrics that are go both ways.  
On the other hand, you don't want to have too many middle values or the design becomes muddy.   My darks were all sort of middle-darks so I have to go looking for some more lighter lights.  Also not sure if they MUST all be batik.  I don't want any obvious prints of course, but maybe some marbled or painted-looking stuff would be good.
Stay tuned!


Little Red Riding Hood

Another project completed, although I never put it on the U.F.O. list so I don't get the satisfaction of taking it off.   I didn't make the dress - just the apron, it is for my friend's daughter's Holloween costume.  She has a great hooded red cape to wear with it.  I hope it's not too warm in Virginia that day!   
Overall I'm happy with the way it turned out.
I didn't use a pattern and didn't have the real live kid to try it on
but I'm pretty sure it will fit okay.

The embroidered hearts, I'm not thrilled with.
In practice, they came out fine,
on the real thing they came out varying a lot
in width.  But I think I'll leave them- no one
is putting it under a microscope, I hope!

I do like the wave pattern on the hem.  This is my favorite pattern.
The thread tension is off for some reason, but I think it's cute.

I'll be able to pack it up and take it to the post office tomorrow.  I'm sure her mom will be relieved that it's done in time.  Knowing me as well as she does, she was probably wondering if it was going to show up FedEx on midnight the 30th!!